When beginning photography, I wanted to learn anything and everything about the craft. I would spend countless hours on the internet searching up tutorials, watching feeds, and gaining inspiration from already established professionals. Here are some bonus tips for beginner photographers that I wish I knew when I first started out.
1. Understand your Camera Modes
The first on my list of bonus tips for beginner photographers is to understand your camera modes. Basic consumer cameras give you the leisure of automating your exposure settings. It automatically selects the settings based on what the camera thinks it’s seeing and uses algorithms through the camera’s processor while interpreting scenes based on a combination of preset variables.
Auto mode lacks the human aspect so your camera can think something is totally different than what it really is. This can lead to overexposed as well as underexposed images. Learn to step away from auto settings so you can get more technical and creative control with your camera.
Reasons people opt for professional level cameras is because they want more control over how they capture images. If you’re one of them, it’s vital to understand the camera modes that can help you better your technical abilities in photography.
There are 4 Modes that all DSLR and Mirrorless cameras offer and are the following:
- Aperture Priority
- Shutter Priority
- Program
- Manual
Aperture Priority Mode
Aperture Priority Mode gives you the ability to select any aperture setting on your camera. The camera’s meter will measure the reflective light in the scene and automatically set the proper shutter speed for you. This will give you control over your depth of field and ISO settings, but not how fast (or slow) your camera captures and image.
This is a faster way to obtain proper exposures if you need depth of field control over shutter speed settings. Keep in mind that this setting can cause camera shake due to the camera thinking it needs to use a slow shutter speed.
Shutter Priority Mode
Photographing in Shutter Priority Mode is the exact opposite of Aperture Priority. You have control over your shutter speed and ISO settings, but not your aperture. The camera chooses the aperture for you. This is still considered an automatic setting since you lack full control of all exposure settings.
Shutter Priority mode is ideal if you want to choose your shutter speed , but want the camera to choose your aperture. Scenes with fast (or slow) moving subjects are ideal to photograph with these settings.
Program Mode
Shooting in Program Mode is similar to full auto mode except for one thing. That one thing is your ISO settings. When you decide to shoot in program mode, you have the ability to change only the ISO settings. The camera then decides what shutter speed and aperture to use based on the scene. Most use this mode if getting the shot and proper exposure is the most important aspect of the image. You still have control over your ISO, but nothing else.
Manual Mode
Utilizing Manual Mode gives the most control that a DSLR or Mirrorless camera can provide. It is a mode that I urge you to get used to especially if you’re a beginner photographer. This mode allows you to choose your shutter speed, aperture and ISO to whatever setting you want. Simply stating that you have full control over both your creative and technical abilities when it comes to photography.
2. The Sunny 16 Rule
This rule is something that I wished I learned when I was still a beginner photographer. As stated in photographytalk.com, the rule can “unlock doors to photography’s hidden garden of beauty”. It can be applied to any type of lighting, but can also be used as a starting point to getting proper exposures during a sunny day.
The first step of using the “Sunny 16 Rule” is to set your aperture to f/16.
Next, you must set your ISO. Remember that you want to use the lowest possible ISO setting in order to capture the “cleanest” photo possible.
Lastly, set your shutter speed in conjunction to your ISO setting. In other words, shoot at the same shutter speed as your ISO setting. So if your ISO is at 100 then photograph using 1/100 sec. shutter speed setting.
3. The Inverse Square Law
Take a break before jumping into #3 of these bonus tips for beginner photographers. This subject may get you a little confused and may cause you to want to move on with your life. So take a quick breather, move on to the next tips, or simply come back to this. Just know that it will speed up your familiarization with settings and help you improve your photography skills.
In terms of the Inverse Square Law, I will only relate this to how it is helpful for exposure settings. If you want to dive deeper in this subject, check out this article from DIY Photography or Digital Photography School.
The Inverse Square Law is:
“The intensity of an effect such as illumination or gravitational force changes in inverse proportion to the square of the distance from the source.”
To put it into simpler terms, the law determines the light fall-off of a given light source. Light fall off refers to the the difference in illumination on a subject as it moves further away from it. Yes sound really confusing right?! This law is used for artificial lighting (ie. strobes), but can also be applied to natural light.
But, first this tip: Understand the Intensities of Light!
Before moving ahead, you should understand the intensity of light. Also known as contrast. Contrast is how hard or soft your light source falls onto your subject. (You can skip this part if you already know about it)
Hard Light
A narrow or direct light source creates Hard Light. Meaning that:
- The light source is close to your subject
- The light is narrow or doesn’t spread out before it hit your subject.
- The light’s not diffused which causes harsh shadows.
You can recognize Hard Light by the type of shadow it casts on your subject(s). The harder the light, the lesser the gradation of light to shadow will be produced.
Soft Light
A wide or diffused light source creates Soft Light. Meaning that:
- The Light source is further from your subject
- The light source is wider and spreads out before landing on your subject
- The light’s diffused which causes soft shadows.
Shadows on your subject(s) determine if the lights source produces Soft Light. The softer the light, the wider the gradation of light to shadow will be produced.
The Inverse Square Law for Beginner Photographers
This law can help you choose the correct aperture or shutter speed setting. The further your subject is from your light source the following can be applied:
- The use of a wider aperture
- The use of a slower shutter speed
This goes vice versa. So the closer you are, the faster or narrow you can make those settings to get a proper exposure. For every increment of distance you are from the light source, the light decreases by 25%
ISL & Exposure
Once you get the proper exposure, you can then inverse the settings to get the exact same exposure. For every 1-stop of increase in f-stop, you decrease your shutter by the same amount of stops and vice versa. Same goes with ISO settings.
A “Stop”, in easier terms refer to every “click” of your aperture or shutter dial.
Hopefully this can help you understand it better if you already got the right exposure settings, but want to change up any of the 3 exposure settings on-camera:
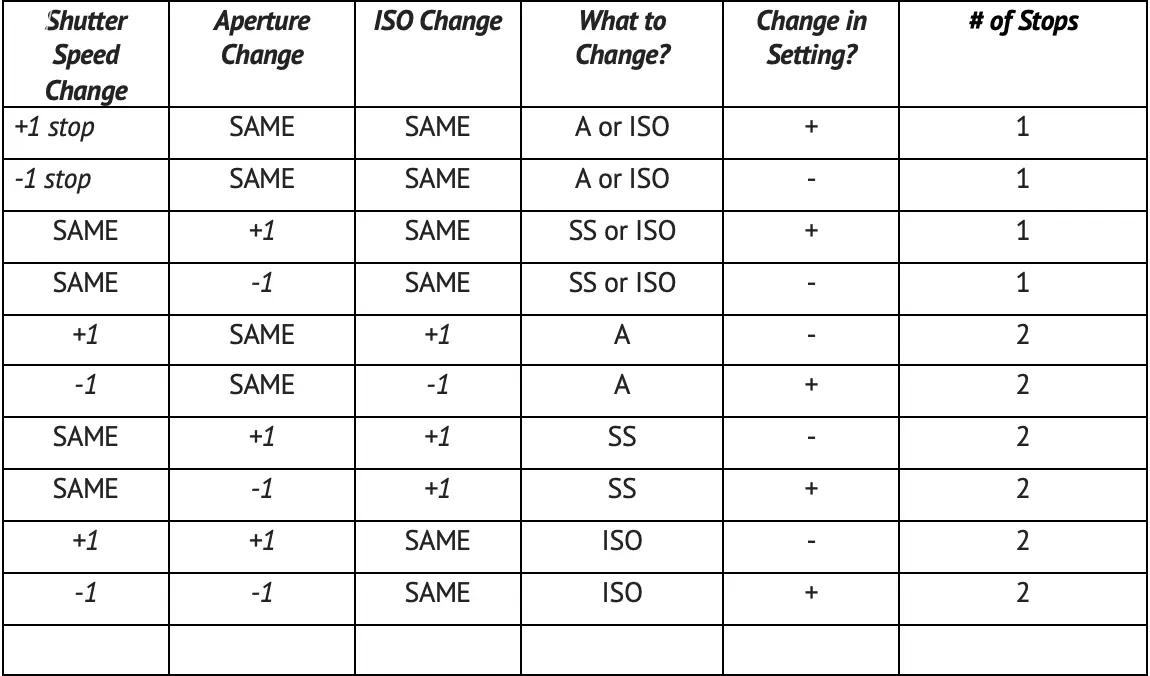
For example, say you have a proper exposure using the Sunny 16 Rule. You shoot at 1/200 of a second, f/16 at ISO 200 and your exposure is spot on . To get the same exposure at f/11, you increase your exposure to 1/400 sec. or ISO to 100.
If you have any questions about this section, feel free to reach out to me or leave some comments below. I know this was a lot, but even to this day, this law still hurts my brain trying to explain it. Once you get the hang of the concept, it will eventually become second nature.
4. Shoot in RAW
Shooting in RAW, uncompressed file formats allow you to get the most possible data stored in a single file image. If you haven’t read my article how to print perfect prints, go take a look now and come back to this. Like mentioned in that post, you want the most possible data to be stored in a file to get the best quality print. The same goes for image capture.
When you shoot in RAW format, your camera records everything onto the file in a non-destructive manner leaving room for you to edit the image the way you prefer. The image that you see on the back of your camera’s LCD screen is a processed jpeg file. Meaning that your camera edits the raw image file based on the camera’s picture control settings and then shows up in the screen.
These edits can include:
- Sharpening
- Contrast
- Brightness Levels
- Saturation
JPEG images are destructive! You lose print quality as well as image quality, but same much more space if file size is important. RAW files are uncompressed. Meaning that what you see in real life is what you get on the image file. You can then go into photo editing software and make adjustments to the image without affecting the image quality.
Remember that editing is a part of the creative process and shooting in RAW allows you to express that creativity during post-production.
5. Keep Practicing!
The last on my list of bonus tips for beginner photographers is to practice as much as you can. Mess around with the different camera settings, find things that inspire you, and just go out and shoot it. Every single professional photographer was once an amateur and the only way they were able to improve in the craft was by going out and shooting anything and everything. Once you get into the habit of creating frequently, photographing images will be like learning how to walk. You’ll never forget how to do it!
The key to becoming better at anything is by doing it every time you have the chance to do it. Just remember that there is always something to photograph whether you realize it or not. My favorite instructor at university once told me that you can photograph 1 thing in an infinite amount of ways. If you feel stuck, find ways to position your subject(s) differently, mess around with light, experiment, do weird and whacky shit and just stay creative!
Now go out and shoot!
So what did you think about this article? Was there anything you feel confused about? Have any questions? or just need help executing these bonus tips for beginner photographers? Reach out to via email at info@raymondenriquez.com
🙂