So you decided to finally jump into the realm of professional photography? or Your boyfriend (or girlfriend) just bought you a brand new DSLR or Mirrorless camera? Here are FIVE of must-know photography tips for beginner photographers!
But first, Exposure!
Before diving into these helpful tips head first, I want to iterate the importance of understanding exposure. Exposure is the brightness or darkness of an image. And thanks to the advancement of mirrorless or digital SLR camera’s, you now have the ability to capture an image at whatever exposure you please.
Setting’s on your camera control three key elements that make up your exposure. Those three are Shutter Speed, Aperture, and ISO. Confused yet? By the end of this article, I’m hoping you’re able to have a clearer understanding of how to get a correct exposure for your photos.
Below are the 5 Must-Know Photography tips for Beginner Photographers:
1. Control Your Shutter Speed
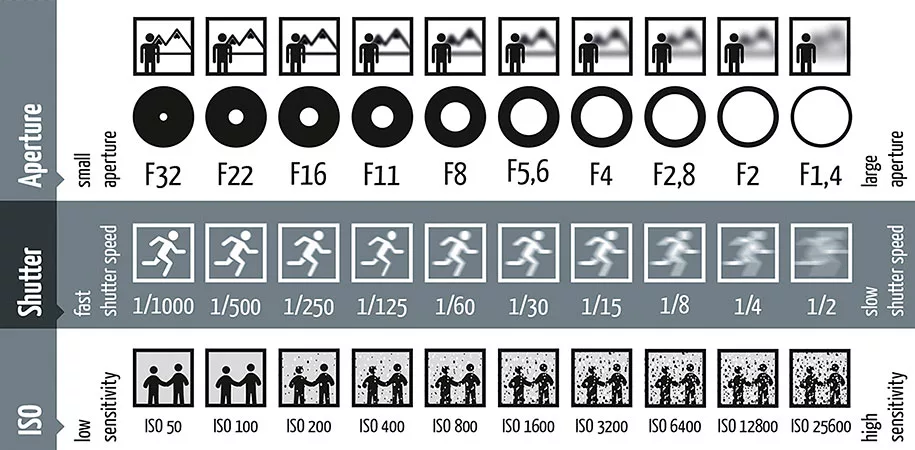
Your Shutter Speed tells your camera how much light to capture. The Camera body controls this measurement in fractions of a second. Most camera’s have a dial to control your shutter speed. So be sure to check your camera’s manual to learn how to change this setting.
Most entry-level DSLR’s or Mirrorless cameras record within a range of 30 seconds up to 1/4000th of a second. Professional, full-frame DSLR/Mirrorless camera’s have the capability to capture images of up to 1/8000th of a second. Some even up to 1/10,000th of a second.
Shooting with a fast shutter-speed allows less light to be recorded in an image. Where as slower shutter speeds allow more light.
This is why you see darker images when photographing indoor at high shutter speeds. Simply because your camera’s sensor needs more time to record the available light to get the proper exposure.
This might be an easier way to understand:
- Faster Shutter Speeds = Measured in Fractions of 1 second (1/#### sec.) = Less Light being captured = Darker Image
- Slower Shutter Speeds= Measured in Seconds (##sec.) = More Light being captured = Brighter Image
2. Get to Know Your Lens Aperture
Aperture controls the plane of focus in the image you want to capture. In other words, how much in-focus your subject is in comparison to your background. It is controlled through a measurement called your “f-stop” (f/#) and is dependent on the capabilities of your camera lens. Controls on your camera allow you to change this setting.
The wider your aperture (f/#), the more out-of-focus your subject will be in comparison to your background. The narrow your aperture (f/#), the more in-focus your subject will be in comparison to your background.
In addition, the amount of allowable light passing through your lens is dependent on how wide or narrow your aperture setting is.
The wider your aperture, the more light will be able to pass through your lens. Thus requiring you to use faster shutter speeds to obtain a proper exposure.
This is the opposite when shooting at a narrow aperture. The more narrow it is, the less light will be allowed to pass through the lens requiring you to use a slower shutter speed to get a good exposure.
Wider apertures refer to a lower f-stop number and Narrow aperture refers to a higher f-stop number.
I know this may sound very confusing at first, but take some time to familiarize yourself with these terms.
Here’s an easier chart for understanding Apertures:
- WIDER Aperture = Low F/-stop (f/#) = Out-Of-Focus back-plane of field = More Light Passing through lens = Need to compensate with faster shutter speeds to obtain proper exposure.
- NARROW Aperture = High F/-stop (f/#) = In-Focus back-plane of field = Less Light passing through lens= Need to compensate with slower shutter speeds to obtain proper exposure.
Most entry-level camera lenses have an aperture ranging between f/3.5-f/22, where as high-quality lenses can have an aperture that can open as wide as f/1.2 – f/2.8 and narrow down to f/22. These tend to be pricier because of the quality of glass and its capabilities.
Now that you got the gist of shutter speed and aperture settings, the next thing you need to know is your ISO settings.
Still confused about aperture? Check out this helpful article.
3. ISO
ISO stands for International Organization for Standards. Not sure why it’s named this, but all I know is that it’s a measurement that controls your digital camera’s sensitivity to light.
Think of a camera sensor as a sponge and you want to gather water from a spill. In this analogy, ISO controls how much water (light) is able to be soaked into the sponge (camera sensor) without spilling over. The higher your ISO measurement, the more sensitive your camera’s sensor will be to available light. Lower ISO settings will make the sensor less sensitive to light.
Digital Camera Sensor Capabilities
Digital camera sensors vary in size. If you are just beginning the journey into digital photography, just know that the larger the sensor, the better quality images you will be able to capture. This is to say that you have obtained a proper exposure using the 3 settings I mentioned above.
Most entry-level DSLR (Digital Single Lens Reflux) and Mirrorless Cameras have an APS-C sensor which is 1.5x smaller than full frame cameras. Full frame cameras have a sensor size that is equivalent to a traditional 35mm film slide except it’s digital.
Going back to my analogy I used of the sponge for ISO, think of the size of a camera sensor as the size of that sponge. The larger the sponge (camera sensor), the greater amount of water (light and information) it’s able to hold (record). In other words, the larger your camera sensor, the better image quality you will get. That’s if you can obtain the proper exposure using these 3 settings in your camera camera:
- Shutter Speed
- Aperture
- ISO
Why is this Important to know?
The reason for having to explain the differences between camera sensor sizes is because it correlates directly to your image quality when choosing your ISO setting. Increasing the sensitivity of a sensor can create things such as incorrect colors, noise (aka grain), color fringing, and color aberrations. This is because your camera’s processor is trying to focus all its energy on strengthening the sensitivity of the sensor than using energy on the algorithms that make up a digital image. (Source)
In layman’s term: Your ISO can directly affect the outcome of image quality. It can turn colors in your image dramatically different than they should be as well as create a lot of grain. This all depends on the size of your sensor and how well it can handle higher sensitivity (ISO) levels.
4. Composition (aka The Golden Ratio Of Photography)
If there’s one thing I learned from my father when I first started photography, it was composition. Composition, composition, COMPOSITION!
The term composition comes from the word Compose meaning “to write or create”. When it comes to photography, in order to compose, or tell a story, you have to give your viewer a chance to understand the image. What story are you trying to tell in a single shot?
You achieve this by positioning image elements within specific areas of the frame. Carefully deciding on the right placements should create movement within the eyes of the viewer. It should draw attention to your subject and allow their eyes to travel through the photo.
Keep in mind that you don’t always have to follow the ‘Golden Ratio of Photography’, but it does help create interesting imagery. In order to compose your image in an interesting manner, you should follow the rule of thirds.
The Rule of Thirds in Photography
The rule of thirds splits your frame into three, equally spaced sections both vertically and horizontally. It will give you 9 rectangles that are equal in size creating 2 horizontal and vertical lines. This will make a Phi Grid. From there, you want to place your subject and/or your horizon line on these lines or its intersecting points, but where it fills 1/3 of the frame.
Composition takes practice, but overtime, this can play a pivotal role in producing photographs that are interesting.
5. White Balance
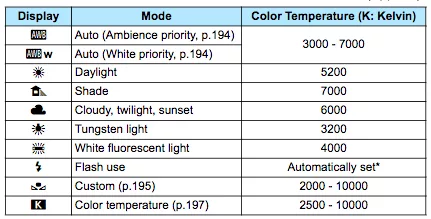
White Balance is another thing you should familiarize yourself with if you’re just beginning photography. This setting controls how your camera records the temperature of light measured in degrees of kelvin(k).
Color temperature is based on a scale of 1,000k to 10,000K. 1000k being Blue and 10000k being Red. (source)
You may hear the terms cool and warm when someone refers to white balance. The term “Cool” refers to a more bluish spectrum of light where as “warm” refers to a more red or deep-yellow spectrum of light.
Knowing your Light Source
Having full control of your image capturing process is the best thing about digital photography. How colors look in the photos you create are also apart of that control.
Light sources are a huge factor in wanting to get specific colors in your image. Ideally, you want the whites in an image to actually look white and your blacks to actually look black.
However, that’s not always the case. Reflective- and light-absorbent material, along with mixed light sources can capture colors that look different than in reality.
Capturing proper light temperatures can easily be accomplish through your white balance setting.
How to Achieve a Proper White Balance
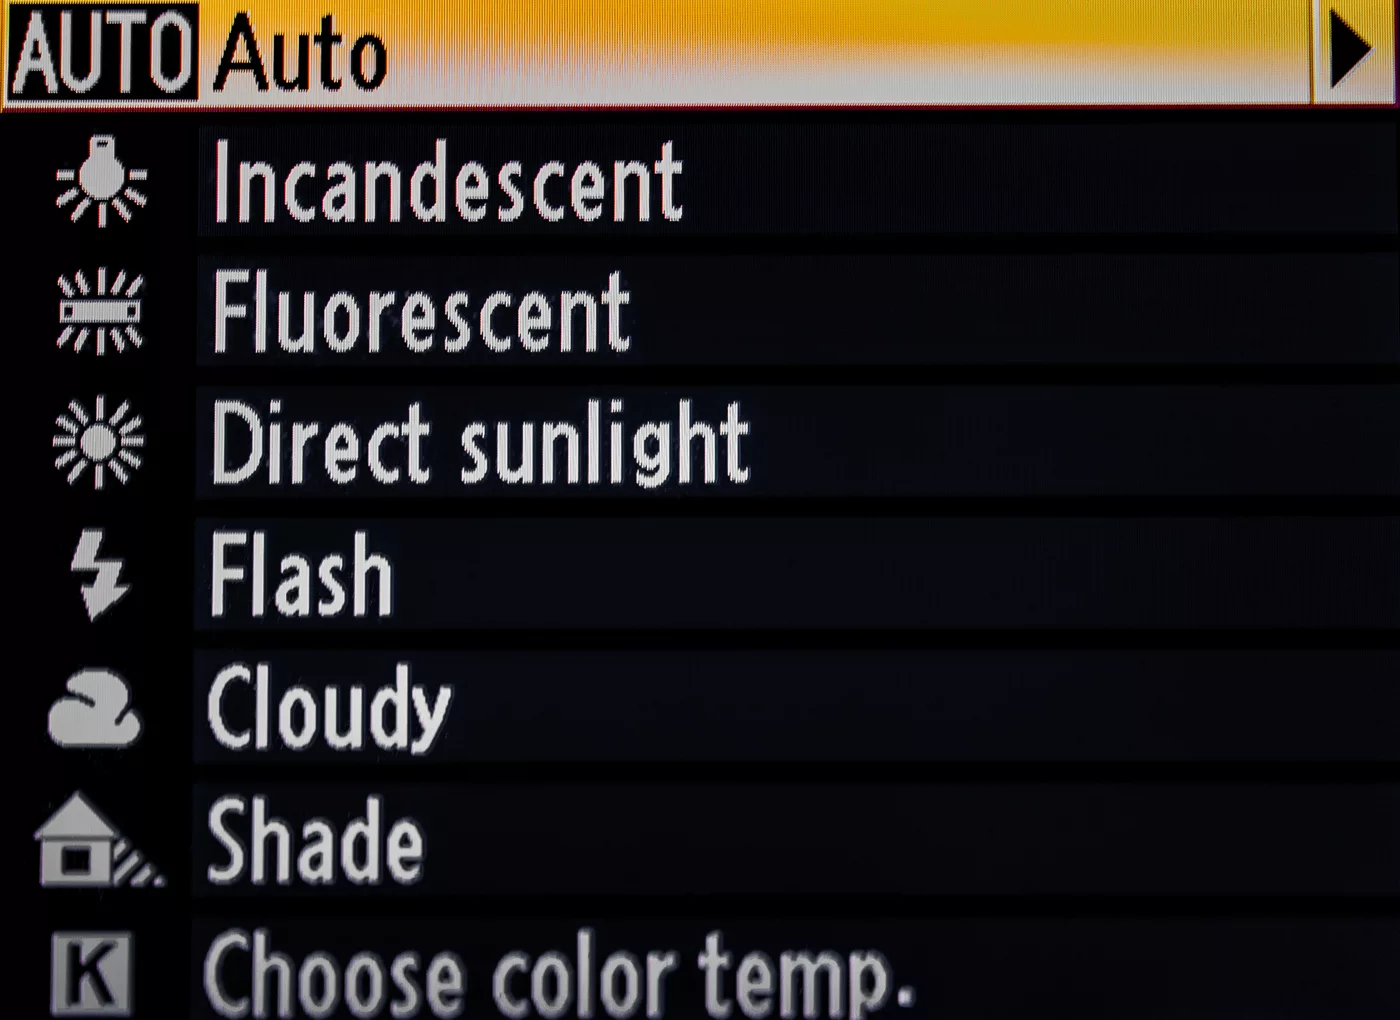
Most entry-level cameras have presets that allow you to designate your white balance based on the available light source. The most common are the following:
- Auto
- Daylight/Sunlight
- Incandescent
- Fluorescent
- Flash
- Cloud
- Shade
- Choose Color Temp.
- Preset Manual.
Depending on the camera manufacturer, presets may differ in order, but are typically the same throughout all camera brands.
In order to choose the correct white balance setting, you simply select the preset that coincides with the lighting conditions you are shooting in.
The way camera brand’s read light differ from one another, so I’ve included some resources below to help you better understand what color temperatures Nikon, Canon and Sony uses with their White Balance Presets.

These Five Must-know photography tips for beginner photographers are just the basics. Practicing your composition and exposure settings will help you better understand what it takes to create better your imagery. Overtime, you will improve and it will be become second-nature. Just like learning how to ride a bicycle: Once you learn (and practice), you’ll never forget! In no time you’ll be creating amazing images that you’ll want to print and maybe even have the courage to enter photo competitions. Just take your time and know that this is only the beginning and remember practice makes perfect! So go out and start creating!
Have any questions about this article? Or want to add to this list of FIVE must-know photography tips for beginners? Reach out to me at info@raymondenriquez.com
🙂
Pingback: You Shouldn't Worry About Camera Brands
Pingback: Shooting in RAW Format
Pingback: Shooting the Surf in Hawaii
Pingback: Photographing images from Inside of the Ocean.